作为程序员,对趁手开发工具和软件的追求是永无止尽的。但是当你买了一台新电脑,或者处于别的原因,需要临时切换到一个全新的机器环境,你肯定和我有同样的想法:能不能把我之前的工作环境快速地移植到眼前这台新电脑上。
一、可移植开发环境方案
1、TimeMachine + iCloud
作为 Mac 用户,苹果公司为我们提供了现成的 TimeMachine 工具,它提供了为计算机环境创建快照的功能,你只需要将快照保存到外部存储,当有新的 Mac 需要启用,通过这份快照可以快速恢复到你熟悉的软件环境。或者你购买了苹果的 iCloud 大容量存储服务,那么也不用定时去创建快照了,可以将应用和其他数据直接同步至 iCloud 即可,方便快捷。
但TimeMachine+iCloud的方案对于非 Mac 电脑就无能为力了,移植性不够全面。而对于临时使用一台新 Mac 的场景,多少有点伤筋动骨:想象下,你的朋友借你 MacBook Pro 使用一天,而你却把这台机器的软件环境整个换了一遍,想象下你朋友接过这台 Mac 时将作何感想。还有一点,这个方案还费钱,毕竟 iCloud 存储空间不是免费的,外置存储也得花真金白银购买不是吗?!
2、Docker + IDE远程开发插件
Docker 自2013年推出以来,就有不少人想以此打造一个个人的可移植开发环境。只要通过一个 Dockerfile ,将所需安装的软件在其中描述清楚,随时随地都能在支持 docker 的环境中构建出相同环境的镜像,基于此镜像运行的实例环境就是你所熟悉的开发环境。再配合宿主机上编辑器或者IDE提供的远程开发功能(如在 vscode 上安装Remote-SSH等插件),就能实现一个接近于开箱即用的可移植开发环境。
基于 Docker 做可移植开发环境虽然还不错,但也并非完美无缺。因为 Docker 依赖于 Linux 内核提供的 Namspace、Cgroup 等能力,在非 Linux 的桌面环境中得安装一个 Linux 虚拟机,在这些环境下的 Docker 就显得不那么轻量了。比如在 Mac 上运行 Docker Desktop ,光虚拟机自身的内存消耗就十分巨大,再加上浏览器和 IDE ,16G内存都不宽裕。Windows 下使用 Docker Desktop 应该也类似(我没试过),或者在 WSL 内安装 Docker。总之,对于我这种追求软件小而美的有洁癖的程序员,这都不够完美。
3、Multipass + Cloud-init
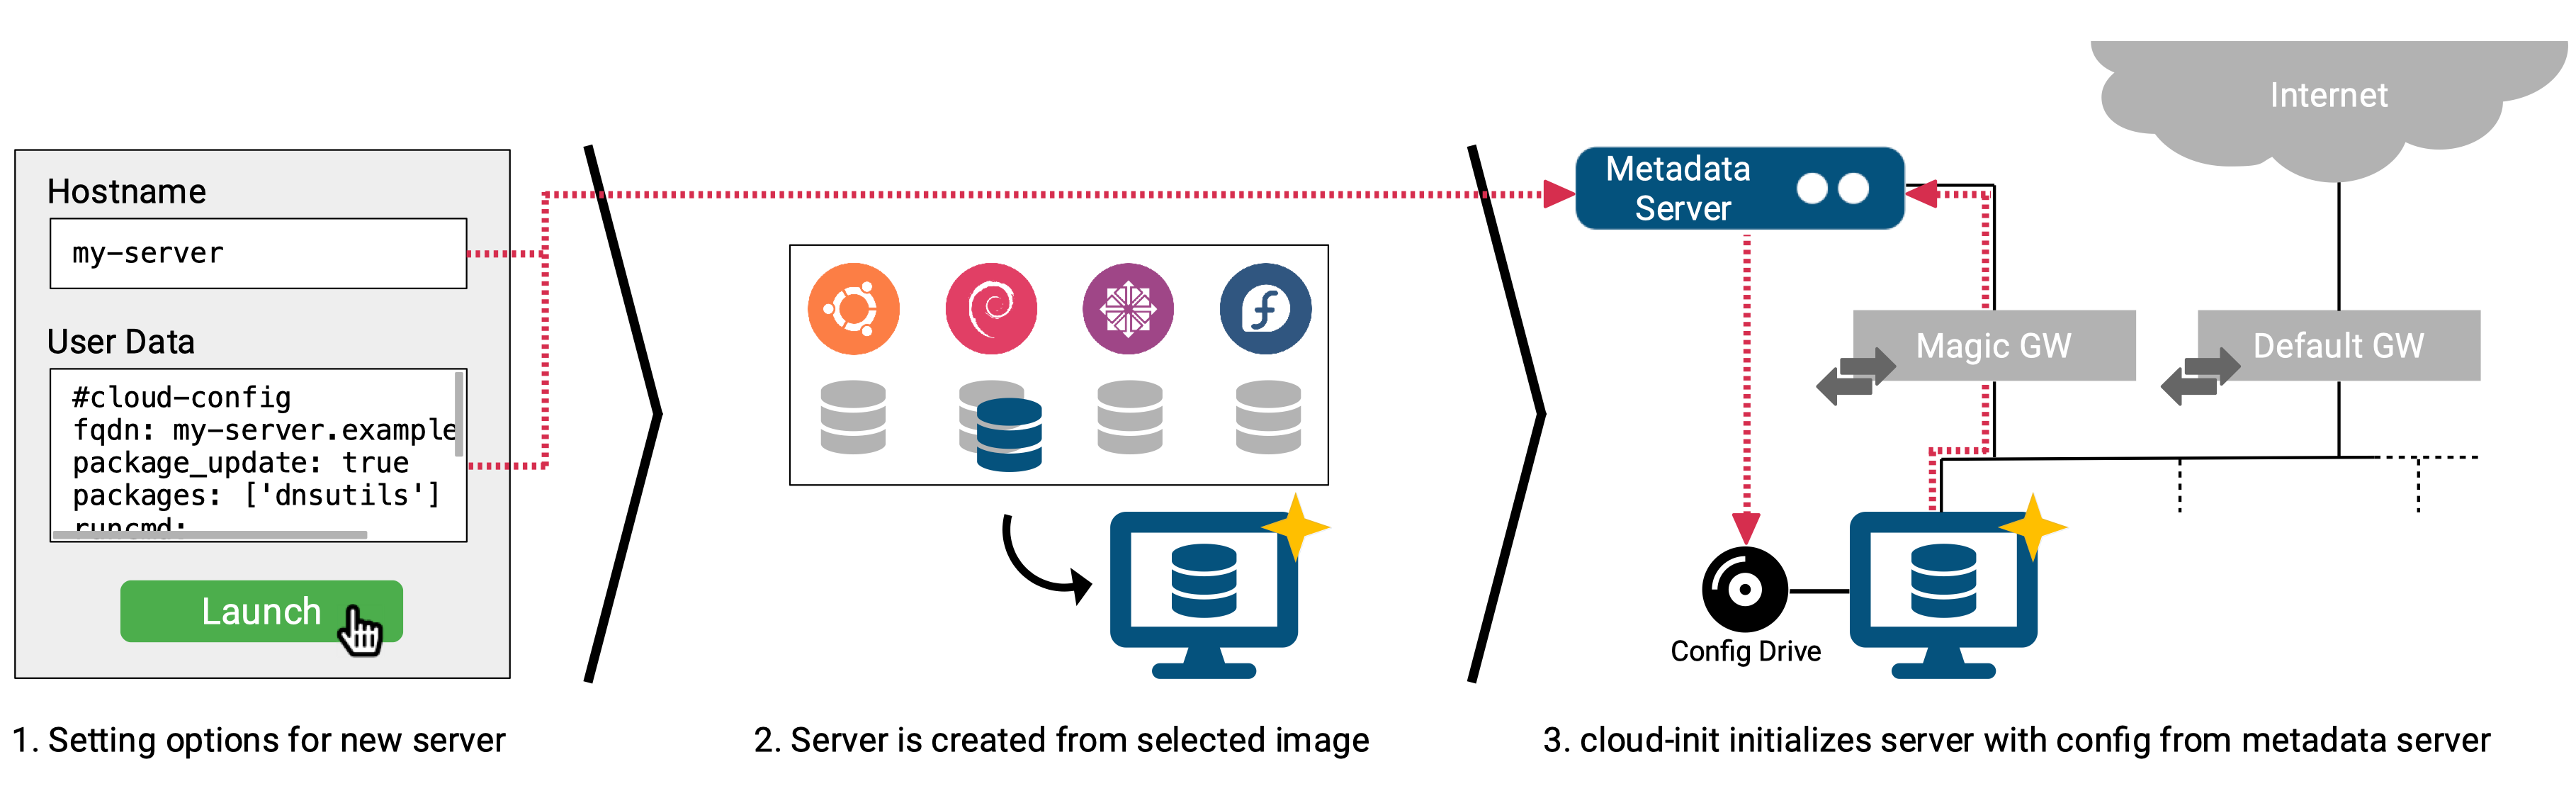
有其他更轻量的方案吗?不久之前,我因为想要安装 k3s,机缘巧合下了解到了Multipass这款软件。它是由著名的 Linux 发行版 Ubuntu 的厂商 Canonical 公司开发的一款跨平台(Linux/macOS/Windows)轻量级虚拟机软件。它不仅安装和操作简单,创建销毁虚拟机实例飞快,关键创建的虚拟机真的非常轻量,消耗的硬件资源也非常少。再配合上Cloud-int完成虚拟机实例的无人值守自动化安装,通过一个简单的文本配置文件就能在任意环境下重建你熟悉的开发环境,是我目前已知的较为完美的方案。
二、Multipass基本操作
由于我平常使用最多的是 MacBook Pro ,下面我将以 macOS 系统为例介绍下它的基本操作。
1、安装
在 macOS 系统下,使用 Homebrew 包管理工具安装 Multipass 十分容易。
1
2
3
4
|
$ brew install --cask multipass
$ multipass --version
multipass   1.10.1+mac
multipassd  1.10.1+mac
|
2、查找可供使用的镜像
创建虚拟机实例的前提是指定一个镜像,通过以下命令可以查看 Multipass 目前所支持的镜像列表。由于 Multipass 和 Ubuntu 是同一个商业公司开发的产品,对于 Ubuntu 的天然支持也是可以理解的。
 1
 2
 3
 4
 5
 6
 7
 8
 9
10
|
$ multipass find
Image                       Aliases           Version          Description
18.04                       bionic            20221117         Ubuntu 18.04 LTS
20.04                       focal             20221115.1       Ubuntu 20.04 LTS
22.04                       jammy,lts         20221117         Ubuntu 22.04 LTS
anbox-cloud-appliance                         latest           Anbox Cloud Appliance
charm-dev                                     latest           A development and testing environment for charmers
docker                                        latest           A Docker environment with Portainer and related tools
jellyfin                                      latest           Jellyfin is a Free Software Media System that puts you in control of managing and streaming your media.
minikube                                      latest           minikube is local Kubernetes
|
3、创建虚拟机实例
实例创建命令提供的参数还算丰富,能覆盖到基本需求,最常用的就是一些硬件资源配额相关的参数。
1
|
$ multipass launch --name vm1 --cpus 1 --mem 1G --disk 10G
|
这样一条简单的命令,默认会使用最新版的 Ubuntu LTS 版本创建一个实例,并在在我这台2021年14英寸 MacBook Pro 上仅花了22秒就创建完成了,速度飞起。
4、查看已创建虚拟机实例列表
1
2
3
|
$ multipass list
Name                    State             IPv4             Image
vm1                     Running           192.168.64.26    Ubuntu 22.04 LTS
|
5、查看虚拟机实例详情
可以看到之前创建的虚拟机的资源消耗是非常低的。
 1
 2
 3
 4
 5
 6
 7
 8
 9
10
|
$ multipass info vm1
Name:           vm1
State:          Running
IPv4:           192.168.64.26
Release:        Ubuntu 22.04.1 LTS
Image hash:     61b29e585d5b (Ubuntu 22.04 LTS)
Load:           0.02 0.03 0.00
Disk usage:     1.4G out of 9.5G
Memory usage:   145.6M out of 961.9M
Mounts:         --
|
6、进入虚拟机
 1
 2
 3
 4
 5
 6
 7
 8
 9
10
11
12
13
14
15
16
17
18
19
20
21
22
23
24
25
26
|
$ multipass shell vm1
Welcome to Ubuntu 22.04.1 LTS (GNU/Linux 5.15.0-53-generic aarch64)

 * Documentation:  https://help.ubuntu.com
 * Management:     https://landscape.canonical.com
 * Support:        https://ubuntu.com/advantage

  System information as of Sat Nov 19 15:10:48 CST 2022

  System load:             0.0
  Usage of /:              14.6% of 9.52GB
  Memory usage:            17%
  Swap usage:              0%
  Processes:               86
  Users logged in:         0
  IPv4 address for enp0s1: 192.168.64.26
  IPv6 address for enp0s1: fdf5:f17d:85c7:2a54:5054:ff:fe7f:c21f


0 updates can be applied immediately.


To run a command as administrator (user "root"), use "sudo <command>".
See "man sudo_root" for details.

ubuntu@vm1:~$
|
7、从宿主机拷贝文件到虚拟机
在宿主机和虚拟机之间拷贝文件是一个高频场景,Multipass 提供了除 scp 外的另一种选择。
1
|
$ multipass transfer ~/.bashrc vm1:/home/ubuntu/.bashrc_bak
|
8、挂载/卸载宿主机目录
对于少量文件,我们可以通过multipass transfer解决。对于需要在宿主机和虚拟机之间共享大量文件的场景,挂载一个宿主机的文件目录到虚拟机中是个更好的选择。
1
2
3
4
5
|
# 挂载目录
$ multipass mount /Users/voidint/workspace/voidint/blog vm1:/root/workspace/blog

# 卸载实例下指定目录
$ multipass umount vm1:/home/ubuntu/workspace/blog
|
9、关闭、启动、重启虚拟机实例
1
2
3
|
$ multipass stop vm1
$ multipass start vm1
$ multipass restart vm1
|
10、删除虚拟机实例
所谓来也匆匆去也匆匆,multipass 创建虚拟机快得飞起,删除虚拟机也是同样。要是加上--purge选项,则可以彻底虚拟机所占用的磁盘空间,做到不留一丝痕迹。
1
|
$ multipass delete --purge vm1
|
三、Cloud-init定制化操作系统
如果说 Multipass 是屠龙刀,那么 Cloud-init 就是倚天剑,少了谁都不完美。
有了 Multipass 就可以随时随地在一个全新的环境中创建和销毁一个轻量级的 Linux 虚拟机,这也就为我们可移植开发环境提供了物理基础。但这离我们可移植的目标还有距离,因为每次创建的虚拟机实例都是一个空白的环境,需要一步步手工去安装和配置你所需要的软件,实在繁琐。我们需要借助 Cloud-init 在创建虚拟机实例的同时,以无人值守的方式自动化安装你所需要的软件,最终产出一个满足你需求的定制化操作系统。这才是我们需要的可移植开发环境。
1、基本使用
Multipass 的launch子命令提供了--cloud-init选项,Multipass 可以从本地文件、URL或者标准输入读取一个 YAML 格式的配置文件,从而实现无人值守安装。
1
|
$ multipass launch -vvvv --name vm1 --cpus 1 --disk 10G --mem 1G --cloud-init ./cloud-init.yml --timeout 999999
|
Cloud-init 的全部内容可能无法短时间内掌握,但这并不妨碍基本使用,参考下这些examples,我们也基本能定制我们自己的操作系统了。下面是我自己的一个配置:
 1
 2
 3
 4
 5
 6
 7
 8
 9
10
11
12
13
14
15
16
17
18
19
20
21
22
23
24
25
26
27
28
29
30
31
32
33
34
35
36
37
38
39
40
41
42
43
44
45
46
47
48
49
50
51
52
53
54
55
56
57
58
59
60
61
62
63
64
65
66
67
68
69
70
71
72
73
74
75
76
77
78
79
|
#cloud-config
# Update apt database on first boot (run 'apt-get update').
# Note, if packages are given, or package_upgrade is true, then
# update will be done independent of this setting.
#
# Default: false
package_update: true


#cloud-config
# Upgrade the instance on first boot
#
# Default: false
package_upgrade: true


# Install additional packages on first boot
#
# Default: none
#
# if packages are specified, then package_update will be set to true
#
# packages may be supplied as a single package name or as a list
# with the format [<package>, <version>] wherein the specific
# package version will be installed.
packages:
 - build-essential
 - libprotobuf-dev
 - protobuf-compiler
 - zsh
 - tree
 - jq
 - upx-ucl


# run commands
# default: none
# runcmd contains a list of either lists or a string
# each item will be executed in order at rc.local like level with
# output to the console
# - runcmd only runs during the first boot
# - if the item is a list, the items will be properly executed as if
#   passed to execve(3) (with the first arg as the command).
# - if the item is a string, it will be simply written to the file and
#   will be interpreted by 'sh'
#
# Note, that the list has to be proper yaml, so you have to quote
# any characters yaml would eat (':' can be problematic)
runcmd:
 # 日志路径:/var/log/cloud-init-output.log
 # 设置家目录
 - export HOME=/root
 # 配置zsh
 - chsh -s /bin/zsh
 - sh -c "$(curl -fsSL https://raw.github.com/ohmyzsh/ohmyzsh/master/tools/install.sh)"
 # 生成ssh key
 - ssh-keygen -f $HOME/.ssh/id_rsa -t rsa -b 4096 -C "voidint@126.com" -N ''
 # 配置git
 - git config --global user.name voidint
 - git config --global user.email voidint@126.com
 # 安装docker
 - curl -sSL https://get.docker.com | sh -
 - echo '{"registry-mirrors":["https://mirror.baidubce.com","https://docker.mirrors.ustc.edu.cn","https://dockerhub.azk8s.cn"],"hosts":["fd://","tcp://0.0.0.0:2375"]}' > /etc/docker/daemon.json
 - sed -i 's/ExecStart=\/usr\/bin\/dockerd -H fd:\/\/ --containerd=\/run\/containerd\/containerd.sock/ExecStart=\/usr\/bin\/dockerd/' /lib/systemd/system/docker.service
 - systemctl daemon-reload & systemctl restart docker
 - docker run --rm --privileged tonistiigi/binfmt:latest --install all
 # 安装k3s
 - curl -sfL https://rancher-mirror.oss-cn-beijing.aliyuncs.com/k3s/k3s-install.sh | INSTALL_K3S_MIRROR=cn sh -
 # 安装g和go
 - curl -sSL https://raw.githubusercontent.com/voidint/g/master/install.sh | bash
 - $HOME/bin/g install 1.19.3
 - $HOME/.g/go/bin/go env -w GOPROXY="https://goproxy.cn,direct"
 - $HOME/.g/go/bin/go install google.golang.org/protobuf/cmd/protoc-gen-go@latest
 - $HOME/.g/go/bin/go install google.golang.org/grpc/cmd/protoc-gen-go-grpc@latest
 - $HOME/.g/go/bin/go install github.com/go-delve/delve/cmd/dlv@latest
 - $HOME/.g/go/bin/go install github.com/mgechev/revive@latest
 - $HOME/.g/go/bin/go install github.com/securego/gosec/v2/cmd/gosec@latest
 # 安装rust(不支持交互式安装方式)
 # - curl --proto '=https' --tlsv1.2 -sSf https://sh.rustup.rs | sh
|
2、使用心得
- 第一条:自定义安装的软件是使用
root用户运行,不要假设它会使用类似 ubuntu 这样的普通用户身份运行。
- 第二条:默认情况下,
HOME环境变量值为空,由于很多软件安装过程中会读取这个变量,因此强烈建议在开始的地方为该环境变量赋初值。
- 第三条:不要使用非绝对路径,比如使用
~指代家目录,绝对路径能让你少走很多弯路。
- 第四条:杜绝交互方式安装或者配置软件,比如
curl --proto '=https' --tlsv1.2 -sSf https://sh.rustup.rs | sh安装 rust 就会失败。
- 第五条:安装结果不符合预期,一定要去查看
/var/log/cloud-init-output.log日志,它能告诉你原因。
- 第六条:多尝试,毕竟试错成本很低很低。
参考